- en
- es
Service model management
The following tasks require administrative privileges.
Log into IthelpCenter portal. In the main menu select Configuración del proceso > Modelo > Editar

Creation of a model
- Click on the button for model creation.
In the edit window enter:
Select and complete model configuration
Title Model name. Comments General comments on function/characteristics of the model.
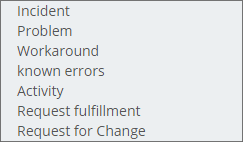
Service type
In the drop-down field select the type of service to which the model will apply. Types:
Normal time
Average time in minutes for the attention of requests related to the model.
Value can be defined as -1 so that the normal time value of the SLA is set
Max. time
Maximum time in total minutes to solve the reported case. This value should be calculated taking into account the average service time and the average number of requests of the same type reported daily.
Value can be defined as -1 so that the max. time value of the SLA is set
Managers informed
Hierarchical escalation
Select the hierarchical escaling group from the drop-down field.
Handler
Functional escalation
Select the functional escaling group from the drop-down field.
Interface ID MD
Seleccionar en el listado el tipo de interfaz1) que aplica al modelo.
Utilizar Default si no existen interfaces.
MT ID AT Role
Select from the list the virtual role to apply to the model.
Choose None if there're no virtual roles.
ET ID AT Role
Select from the list the virtual role to apply to the additional fields in the case creation form.
Choose None if there're no virtual roles.
Possible returns
Define possible values to choose as a result of the case attention. Add values and press ENTER for each value.
Change Approved, Rejected.
Guide General instructions for the attention and solution of cases, taking into account the service and the steps contemplated in the model.
- Click on Accept button to save the basic information of the model.
The following tabs will be enabled:
Steps: To add steps to the model
Extra fields: Configuration of forms for case creation.

Add steps to the model
- In the tab Steps click on the button


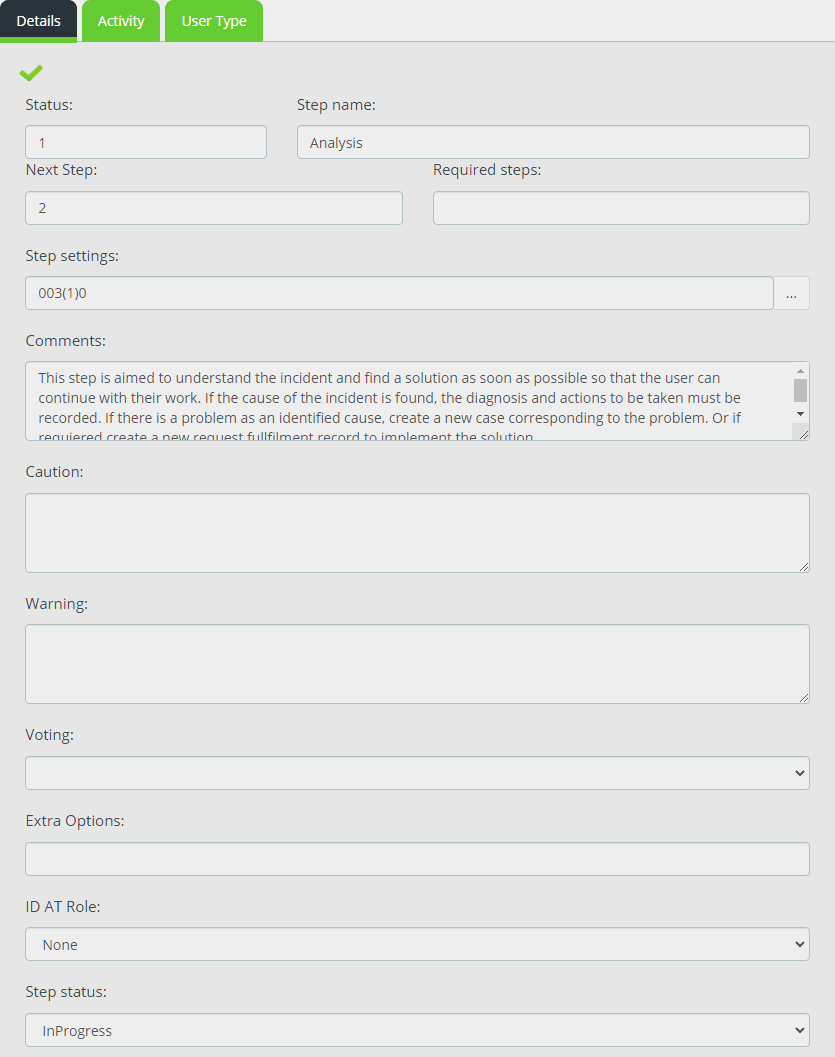
Details tab
- The Details tab containing the basic form for editing the step will be activated.
Complete the following information
Status Step number in the list.
* Step name
Name the step. Example: Analysis, Solution, Solution validation
* Next step
Enter the number (status) of the next step in the process.
For more than one step, separate by commmas.
It can define previous or next steps, depending on their position on the list.
Required Steps
Enter the number (status) of the step that is required before the current step.
Step settings
Enables advanced scheduling of automatic tasks at the step.
Comments
General comments on the step.
Caution
/ Warning
Additional step recommendations.
Voting
Allows to include surveys/voting in the step.
ID AT Role
Select from the list the virtual role to apply to the step.
Choose None if there're no virtual roles.
* Step status
Select from the list the status that the case will have when it is in the step. Available options:
In Progress: The case is in the attention and solving process.
Paused: This function avoids exceeding the maximum time per SLA/Model. A case is manually changed to this status when during case attention, the advisor requires a result or response from users, groups or third parties to continue with the attention and solution of the case.
Resolved: This status indicates that the case is resolved and it has been confirmed that the reported service(s) have been restored.
* Mandatory fields.
- Once the step configuration is completed, click on the button

Follow the same procedure to add more steps to the model.


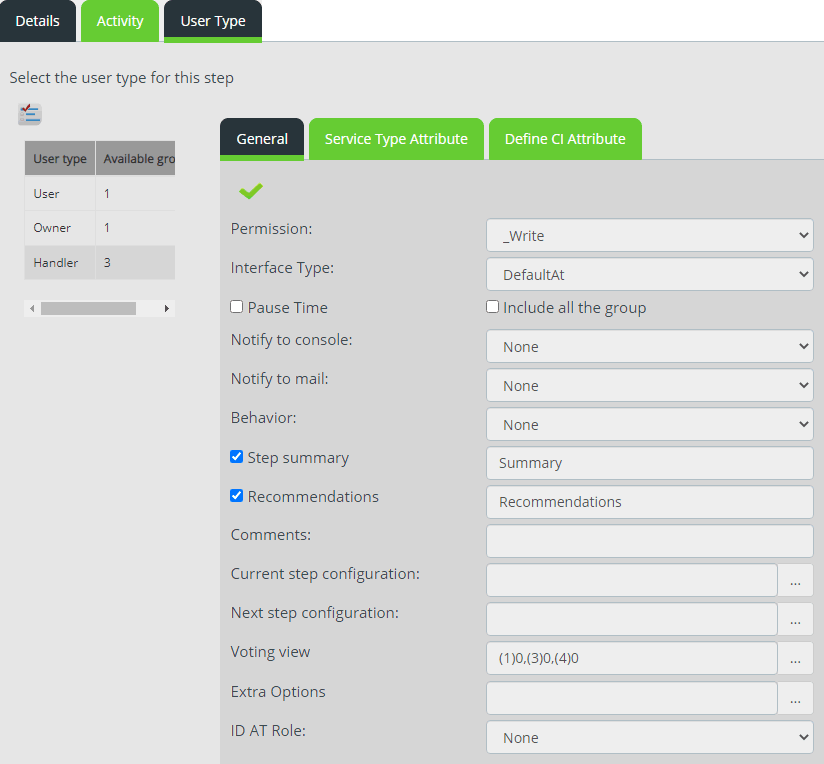
User Type tab
- The creation of the step will also activate User Type tab, which allows configuring the model users.
Click on button to select user type(s)
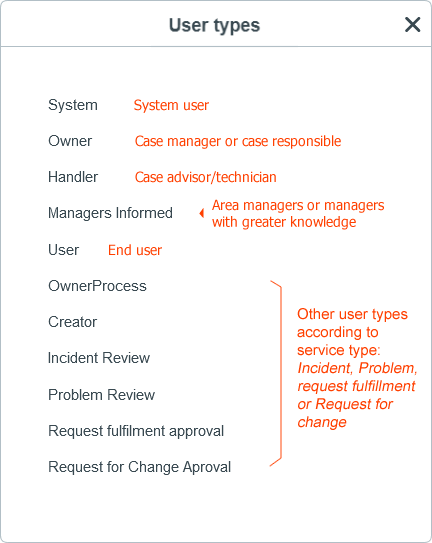
For each user complete the following information
* Permission
Select in the field the viewing/editing privilege of the case assigned to the user type. Available options:
Read:Enables case display
Write:Enables viewing and editing of the case, enables case editing tools
Disable
* Interface type
Select from the list the type of interface 2) that applies to the user in the step.
Choose Default in case there're no interfaces created.
Options
Enable Include all the group in case there's a voting configured for the step.
Notify to console
Select in the drop-down field the notification that will be sent to the console when the case is in this step.
Notify to email
Select in the drop-down field the notification template that will be sent to the email when the case is in this step.
Behavior
Allows you to select the display mode for the end-user. Available options:
None: Default option, normal display of the case
CSATSurvey Display of the user satisfaction survey
Step summary
When this checkbox is enabled, it will display this field to add a brief summary before proceeding to the next step.
If enabled, in the text field enter the name that the field will have.
Recommendations
When this checkbox is enabled, it will display this field to add comments/recommendations before proceeding to the next step.
If enabled, in the text field enter the name that the field will have.
Comments
Allows additional questions to be sent to the end-user to validate case information and change steps.
Current step configuration
Allows to display the question defined in the Comments field when the end-user logs in the ITHC console.
Next step configuration
Allows to configure the step at which the case will continue according to the response and options defined in Comments and Actual step configuration.
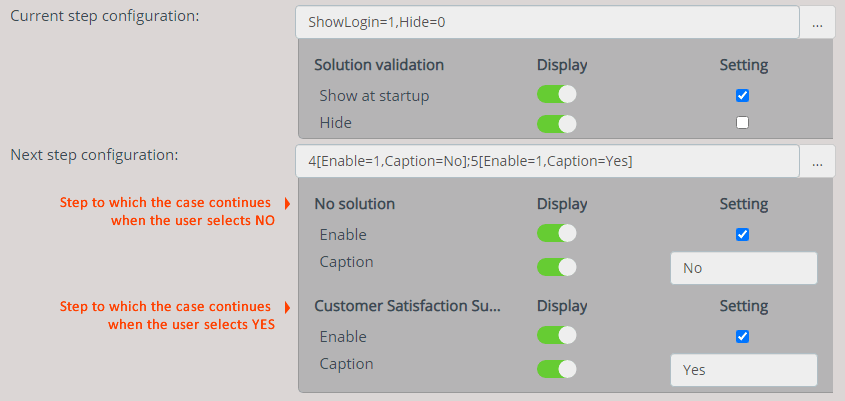
Voting view
Allows to configure voting/survey in the step.
ID AT Role
Select from the list the virtual role to apply to the step acording to the user type.
Choose None if there're no virtual roles.* Mandatory fields.
- Once the step configuration is completed, click on the button
Repeat the same steps with each type of user added to the step.


Add forms to the model
Forms can be added to:
- Extra fields tab: Forms added in this tab will be visible during case creation.
- Step > User Type > Service Type Attribute: Forms related to the service types will be visible in the case management console.
- Step > User Type > Define CI Attribute: Forms related to CIs (people, device, knownerror, workaround, etc.) These types of forms will be visible in the case management console.
Extra fields forms
- Select service type and form.
- Enable options and permissions:
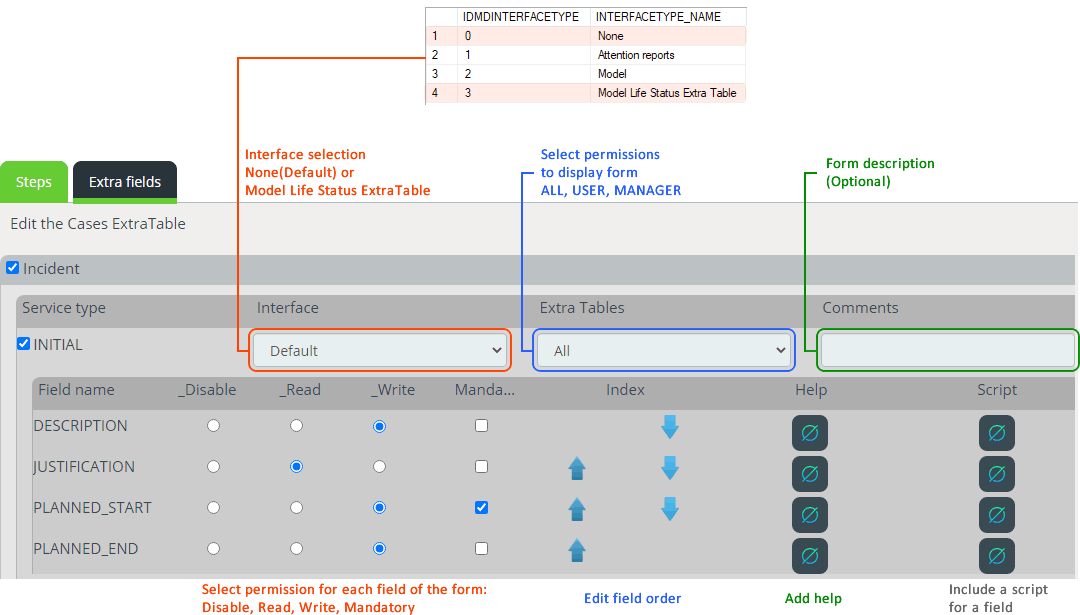
- Click on the Accept button to save changes.

Forms in Define CI Attribute
- In the step and for the user type, select the Define IC attribute tab.
- Activate the service type and form checkboxes. Enable the options and permissions.
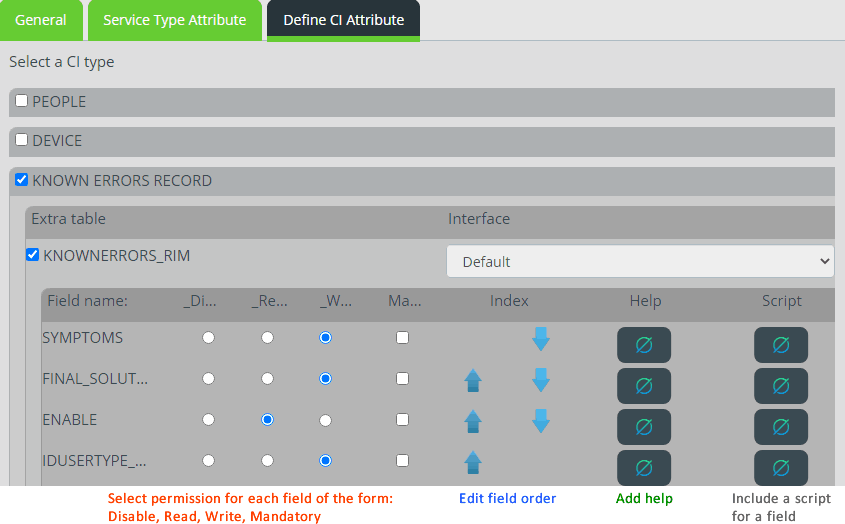
- Once the configuration of the form for the step, click on the button and then click on the Accept button.

Forms in Service Type Attribute
- In the step and for the user type, select the Define IC attribute tab.
- Activate the service type and form checkboxes. Enable the options and permissions.
- Once the configuration of the form for the step, click on the button and then click on the Accept button.
Model editting
- Select the model from the list and click on the Edit button.
- Make changes to any of the model's configuration options: basic information, steps, user type configuration, forms, etc.
- Once the configuration has been completed, click on the button (If it is a change related to the steps) and then click on the Accept button.
- To update model changes in open cases (if applicable):
- Shut down ITHC services on the server and open the Setupbox.exe module.
- Setup.box path:\Program Files\LeverIT\Discovery\Software\SrvPrg\Setupbox.exe
- Open Setupbox, right click on the icon
 in the taskbar notification area and select the Open option.
- Select the node Module > Common and click on the Upgrade Lifestatus Case MT button, the upgrade will be executed.
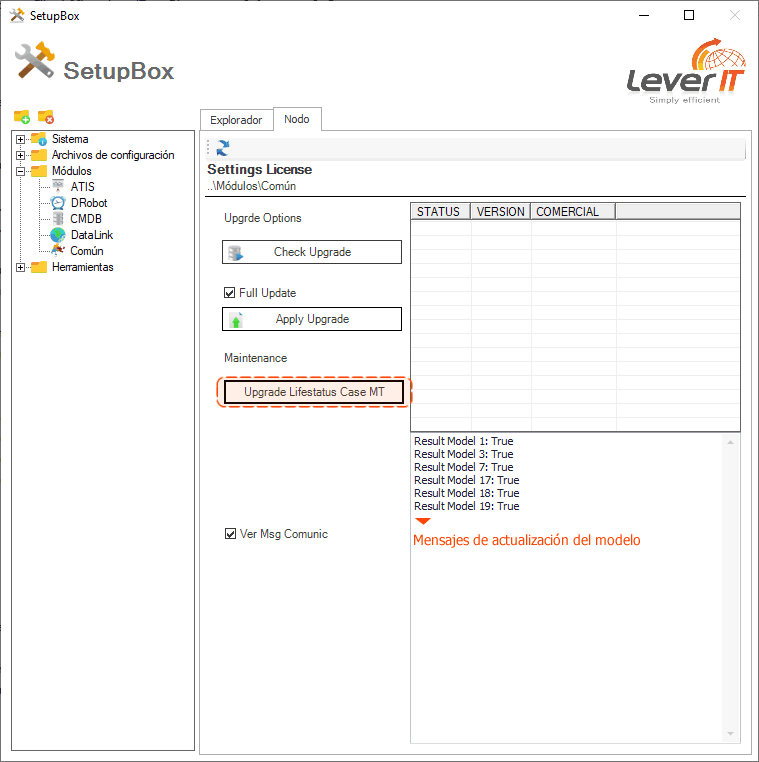
- Close the setupbox module and reinitialize the ITHC services on the server.

